
Outdoor wedding photography preparation is the process of planning your lighting conditions, timeline, equipment, and communication with your photographer before the big day arrives. Get it right and you end up with images that feel alive, warm, and genuinely you. Get it wrong and you are left with squinting faces, harsh shadows, and missed moments you cannot recreate. This guide covers everything you need: how to schedule your day around the best light, what gear considerations matter, how to work with your photographer, and how to encourage those beautiful, natural moments that make wedding photos truly special.
How to plan your outdoor wedding photography preparation around natural light
Natural light is the single most important factor in outdoor wedding photography. Golden hour and shade consistently produce the most flattering, emotionally rich images. That is the foundation your entire day should be built around.
Midday sun is the enemy of great outdoor portraits. Overhead sun creates harsh shadows that flatten faces and make everyone look tired. Scheduling key portrait sessions for early morning or late afternoon solves this problem before it starts.
Golden hour, the window roughly 30–60 minutes before sunset, is the best time for romantic couple portraits outdoors. Photographers plan sessions right before sunset to capture that warm, natural glow that no studio light can replicate. Build your day backwards from that window.
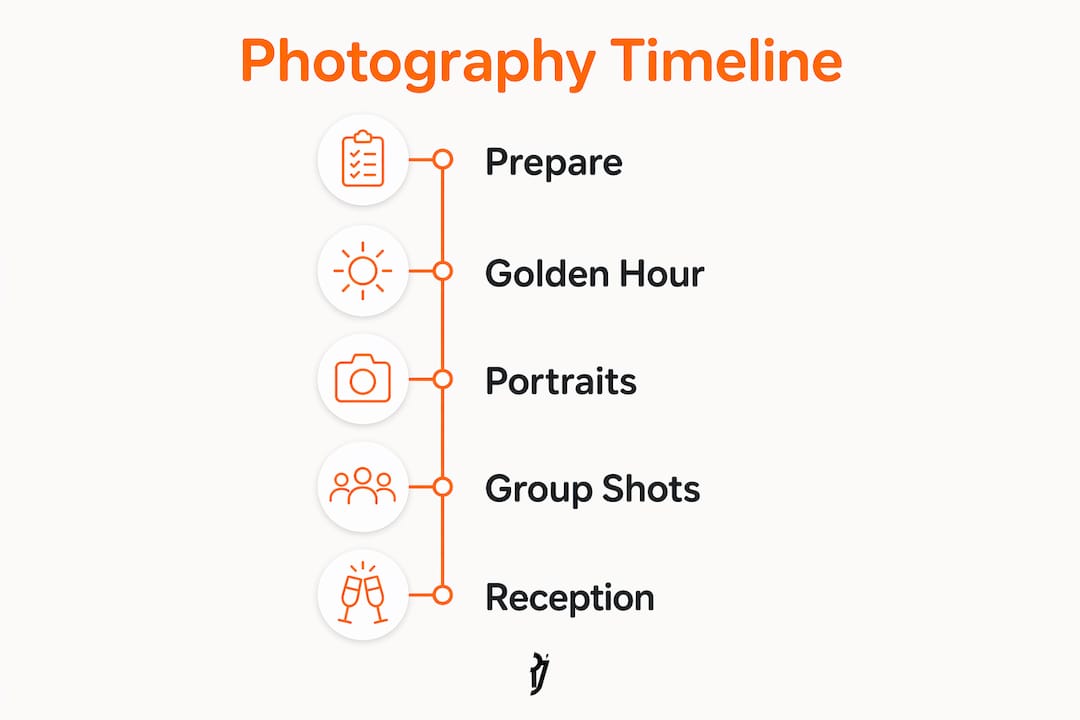
Building a photography timeline that works
A practical wedding day timeline for photography follows a clear structure:
- Getting ready shots — schedule these in a room with large windows and natural light, ideally in the morning.
- First look or pre-ceremony portraits — use early afternoon shade rather than open sun.
- Ceremony — position guests and the couple to face away from direct sun where possible.
- Family formals — keep these brief and in open shade; aim for no more than 20–30 minutes.
- Golden hour couple session — protect this slot fiercely. It is the most valuable 30 minutes of your photography day.
- Reception candids — natural socialising produces the best unposed images.
Build buffer time into every transition. Weather delays, family wrangling, and wardrobe adjustments are all normal. A buffer of 15 minutes between major sessions prevents the whole day from running late.
Pro Tip: Share a detailed shot list with your photographer at least two weeks before the wedding. Splitting your shot list into categories such as getting ready, ceremony, portraits, and reception helps both of you stay organised without feeling rushed.
What equipment and preparations make outdoor photos better?
Couples do not need to understand every piece of camera equipment, but knowing what supports great outdoor photography helps you make better decisions on the day.
What to be aware of for outdoor shoots
- Reflectors and diffusers — your photographer may use a reflector to bounce soft light onto your face in shaded areas. This fills in shadows without flash.
- Natural shade as a tool — a tree canopy, a barn doorway, or a covered terrace all act as natural diffusers. Identify these spots at your venue during a site visit.
- Weatherproof gear — unpredictable weather requires flexibility in both location and equipment. Ask your photographer what their wet weather plan is and agree on a backup location in advance.
- Flash outdoors — flash use outdoors flattens faces and creates unnatural lighting. A good outdoor photographer relies on available light and reflectors rather than flash wherever possible.
- Your dress and accessories — very bright white dresses and highly reflective jewellery can cause exposure challenges in strong light. Discuss this with your photographer during your planning meetings.
Guest phones and cameras
Guests with phones are a lovely addition to your photo collection, but a few light guidelines help enormously.
| Situation | Guidance for guests |
|---|---|
| Ceremony | Ask guests to keep phones down during key moments so they are present and not blocking sightlines |
| Golden hour | Mention the time in your welcome speech so guests know when to head outside |
| Phone technique | Walk closer rather than using digital zoom, which reduces sharpness |
| Focus | Tap the face on screen to set correct exposure outdoors |
Pro Tip: Mentioning golden hour in your welcome speech is one of the simplest ways to improve the quality of every guest photo taken that evening. It costs nothing and takes ten seconds.
How to work with your photographer before and during the wedding day
The relationship between you and your photographer is the biggest variable in how your photos turn out. Preparation and communication before the day make an enormous difference.
- Discuss your style early. Share images you love and images you do not. Be specific. “Relaxed and candid” means something different to every photographer, so show examples.
- Book a pre-wedding engagement shoot. Familiarity with your photographer reduces tension on the wedding day and produces more natural, authentic images. An engagement shoot is the best investment you can make in your wedding photography.
- Share your shot list and special requests. Flag any family dynamics your photographer should know about, such as divorced parents who should not be photographed together, or a grandparent who tires easily.
- Agree on the schedule together. Your photographer should be part of building the day’s timeline, not handed it at the last minute. Their input on light and logistics is genuinely useful.
- Trust their judgement on the day. Weather changes, venues shift, and moments happen unexpectedly. A good photographer adapts. Your job is to relax and let them work.
Understanding common photography mistakes before the day also helps you avoid inadvertently creating problems, such as scheduling family formals in harsh midday sun or leaving no time for couple portraits.
How do you capture natural, candid moments outdoors?
Candid photography is not accidental. It is the result of deliberate preparation that creates the conditions for genuine moments to happen.
Movement-based posing produces the most authentic outdoor portraits. Walking hand-in-hand, a gentle forehead touch, or laughing at something your partner just said all create images that feel real because they are real. Static poses where both people stare at the camera rarely capture the emotion of the day.
Here is a simple framework for encouraging natural moments throughout your wedding:
- During the ceremony — focus on each other, not the camera. The best ceremony shots come from couples who forget the photographer is there.
- During cocktail hour — this is prime candid territory. Move between your guests naturally. Your photographer will follow without directing you.
- During the couple portrait session — ask your photographer to give you a simple task, such as walking slowly or whispering something to each other. Tasks produce movement, and movement produces great images.
- During the reception — dance, laugh, eat, and celebrate. The most joyful reception photos come from couples who are fully present.
- With guests — genuine hugs and conversations photograph beautifully. Staged group shots rarely match the warmth of a real moment caught mid-laugh.
“A focus on partner interaction rather than the camera reduces stiff, posed images and increases authenticity.” This is the principle that separates memorable wedding photography from forgettable snapshots.
Light-touch guidance given to guests during optimal lighting times increases both the quantity and quality of casual photos captured. A brief mention in your welcome speech or on your order of service is all it takes.
Key takeaways
Thorough outdoor wedding photography preparation, built around golden hour timing, clear communication with your photographer, and movement-based posing, produces the most authentic and memorable images of your day.
| Point | Details |
|---|---|
| Prioritise golden hour | Schedule your couple portrait session 30–60 minutes before sunset for the best natural light. |
| Build a detailed shot list | Segment your list by event stage and share it with your photographer at least two weeks before the day. |
| Book an engagement shoot | A pre-wedding shoot builds comfort with your photographer and reduces tension on the day. |
| Use movement over static poses | Walking, laughing, and gentle touches produce more authentic images than posed stares at the camera. |
| Plan a weather backup | Agree on an alternative indoor or covered location with your photographer before the wedding day. |
What I have learned about preparing for outdoor wedding photography
Every couple I photograph comes to me with a slightly different idea of what preparation means. Some arrive with a colour-coded spreadsheet. Others have barely thought about it. What I have noticed, consistently, is that the couples who enjoy their photography day the most are not the ones with the most detailed plans. They are the ones who have done just enough preparation to feel confident, and then let go.
The biggest mistake I see is over-scheduling. Couples pack the day so tightly that there is no room to breathe, and the photos reflect that stress. Golden hour portraits taken with a relaxed couple who have had a moment to themselves always outperform technically perfect shots taken with a couple who are exhausted and watching the clock.
The second mistake is skipping the engagement shoot. I cannot overstate how much a pre-wedding shoot changes the dynamic on the wedding day. By the time we are photographing your ceremony, you already know how I work, you are comfortable in front of my camera, and you trust me to find the right moments. That trust shows up in every single image.
My honest advice: sort your timeline, share your shot list, book that engagement shoot, and then give yourself permission to enjoy the day. The photos will follow.
— Richard Jarmy
Planning your outdoor wedding photography with Richard Jarmy
Richard Jarmy Photography specialises in joyful, candid wedding photography that captures the real moments of your day, not just the posed ones.
Whether you are planning a garden ceremony, a countryside barn, or a coastal celebration, Richard works with you before the day to build a timeline, discuss your style, and create a shot list that covers everything that matters to you. Every couple receives personal attention and genuine care, from the first conversation to the final gallery. Visit the wedding photography page to find out more about availability and how Richard can help you prepare for the outdoor wedding photos you will treasure for life.
FAQ
What is the best time of day for outdoor wedding photos?
Golden hour, roughly 30–60 minutes before sunset, produces the warmest, most flattering light for outdoor portraits. Early morning light works equally well if your schedule allows.
How do I prepare a wedding photography shot list?
Segment your shot list by event stage, covering getting ready, ceremony, portraits, and reception. Share it with your photographer at least two weeks before the wedding.
Does an engagement shoot really make a difference?
Yes. Familiarity with your photographer before the wedding day reduces tension and produces more natural, authentic images during the ceremony and portraits.
What should I do if it rains on my wedding day?
Weather preparedness means agreeing on a backup covered or indoor location with your photographer before the day. Overcast conditions actually diffuse light beautifully and often produce excellent photos.
Should guests use flash on their phones during outdoor photos?
Flash outdoors flattens faces and creates unnatural results. Encourage guests to use natural light and to walk closer to the subject rather than using digital zoom.