
During the Corona virus lockdown I tried a few different things out to keep creative and one of those things was startrails. Elon Musk had just launched his Star Link Satellites, so my main reason for standing out in a cold dark field was to try and capture them going across the sky.
I asked a photographer friend what settings he used to capture their startrails I’d seen a few days previous and he sent them through. I tried to do the same, but due to the light in the sky at the time, I adjusted the settings slightly to suit the time of evening and the spill of daylight just in the shot.
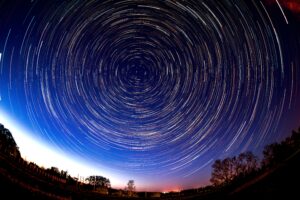
To say I was surprised with the results was an understatement and for 3 nights in a row, I tried 3 different ways of capturing the stars.
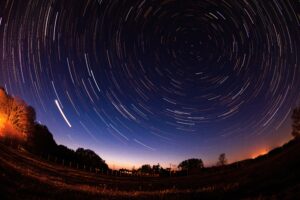
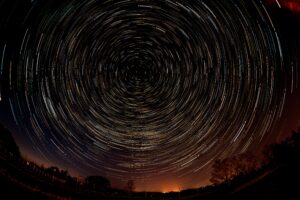
First night, I set my camera North so to capture the rotation of the earth at 20s exposures.
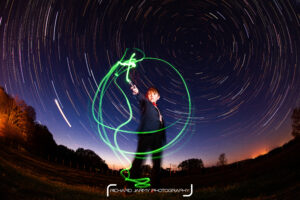
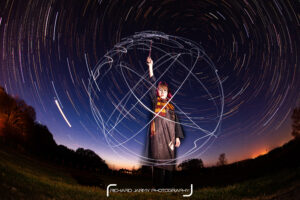
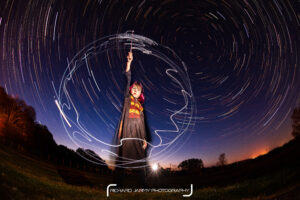
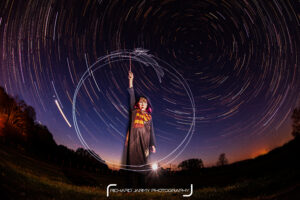
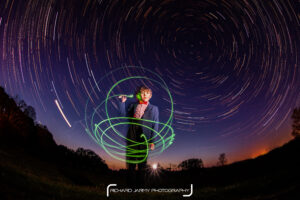
Second night I directed it South West to get some larger startrails, but I set the exposure to 30s and then on the last night, set to the North again but on 15s and this time added in my son, Jude, dressed as Harry Potter with a light wand and he then changed into Matt Smith the 11th Doctor Who with his sonic screwdriver lit up to create some light painting magic!
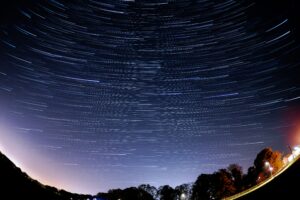
Second night I directed it South West to get some larger startrails, but I set the exposure to 30s and then on the last night, set to the North again but on 15s and this time added in my son, Jude, dressed as Harry Potter with a light wand and he then changed into Matt Smith the 11th Doctor Who with his sonic screwdriver lit up to create some light painting magic!
What You Need
Camera with the ability to take long exposure shots.
Manual mode and manual focus. I set the focal point to infinity, or try to make sure that the stars are in focus of course.
Tripod to keep the camera in place and still. I use a small floor level one so I can get some of the ground into the foreground also.
Wide Angle Lens – I used a 16mm 2.8 fisheye, set at f/5 and ISO 500.
15 second exposures for around 1 hour so you will end up with around 280 ish photos
The camera settings for capturing the startrails depend on the amount of daylight light that is around at the start of the series of photos. play around with the settings to get the desired result before actually setting the camera into continuous shooting mode for an hour. Obviously if it is really quite dark, then up the exposure to 30 seconds or the f stop to 2.8, 1.4 etc, but this is what you can play around with before you start.
With my Sony camera, I can use the app for my phone called Imaging Edge Mobile, which can control the cameras shooting settings and put it into continuous shooting mode, which saves me from using a wired remote
If you are adding a person into the photo, then I did this by using a rear off camera flash behind the subject as well as another flash aiming at the face at lowest power but again the power of the flash can be adjusted to suit.
Set focal point onto the face of the person and take one 15 second shot with the flashes firing at the start of that capture. If they have a light (wand, sonic screwdriver, torch etc) then get them to wave that around, but not pointing back at their face (unless you are going for a spooky type of ghosting effect)
Once you are happy with the photo you have taken, you can then go back to the first part of this tutorial and set focus to infinity (or so that the stars are in focus and set the camera to continuous.)
Editing
I use lightroom to add a slight adjustment to one of the startrail photos and then copy the settings over to all the (280 ish) photos, then export them all out as jpgs.
If adding a person into the mix, edit this too to make sure you are happy with the settings.
Important not to rotate any of the images unless you rotate them all exactly the same!
I then Import the startrail photos into Starstax – https://markus-enzweiler.de/software/starstax/ – easy tutorials on this available on their site so I won’t go into it here, but it is very easy to use.
Once the startrail has been created in Starstax, I then save the high res jpg out of that which will make up my startrail photo.
If adding the person into this, I then use photoshop to import the startrail, then import the person photo I took before the startrail and set the person layer properties to lighten. You will then see that all the light areas in the star trail photo will spill through to the person layer. You can then use the eraser tool to carefully get rid of any lights or stars that are over the person. You may even erase any flash spill that you may see on the ground etc but that is entirely up to you.
Once happy with the final result, save it out and tadaaaa! ???? xx
Should you need any help, then please do ask as I’m more than happy to help you achieve your desired results!
#startrails #helpfultutorial #bekind #lockdowncreativity